Monday, June 21, 2010

A Ladybug for my Livvybug


My Olivia is turning one this coming Saturday. For her big day, I decided to do a ladybug. In the future, I should allow myself more than three hours to do something like this! Mom baked the cakes for me on Friday night, and I decorated Saturday morning. This was two batches of buttercream (one pink, one chocolate), which is something I haven't attempted, and proved to be alot of work. Luckily, I had pre-colored black Wilton fondant, so that was one less color to make! Honestly, I find dying the fondant for
details to be easy and relatively quick. The flowers looked nice; I curved the edges of that top layer. One thing I would love to get it is the Cricut Cake, which does amazing looking flowers with these icing sheets - anyone use one before? I also used the steamer to finish this cake off, which I've seen on Cake Boss - SO COOL! it was so easy and really gives the cake the perfect finishing touch, and gets rid of imperfections (ie. that pesky confectioners' sugar that gets all over the fondant while you're rolling it!)


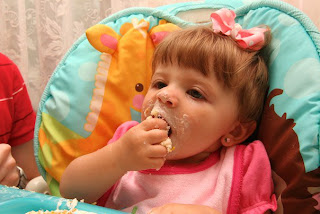
One thing I will remember for next time is my icing spreader, because the buttercream was not nearly as smooth and I would have liked it to be. Overall, I was happy with how the ladybug turned out! I'd probaby give her some eyelids next time (threw away the excess black fondant before I thought of it!) I should have gotten a better picture of Olivia with the cake, but with all the confusion of the day, and her having her own "smash cake," I completely forgot! DOH!

Friday, February 26, 2010

My first cake... finished!

So, dad's Birthday party was a success - the man who you can usually get nothing by was actually surprised!

The cake was an adventure. Mom baked both layers for me since baking isn't my thing. I convinced her to make a chocolate ganache filling, since we weren't icing it with chocolate icing, like dad wanted. I took one taste of the ganache and knew she had added a secret ingredient - RUM! Needless to say, Mommom's chocolate cake recipe, and mom's ganache made for one heck of a cake.

I abandoned my initial green cake with golf balls idea when I realized that I needed to stick with a color scheme. After debating colors all week, I settled on a tan color fondant to cover the whole cake, with a maroon, yellow and brown argyle print. Overall, I was happy with the final product.

A few things that I learned:
Do NOT use pre-made decorator icing; making my own would have definitely made for easier piping!!

After molding the cereal treats, carve them out for cleaner lines.

Try the steamer for finishing off the cake - I meant to do this once I got it to my parents' house, but completely forgot!


Happy 60th Birthday, Dad!

Saturday, February 13, 2010

Fun with fondant...


Tonight, my parents and my sister, Jen, were over for dinner, so I decided to experiment. Mom is the expert baker, and Jen was the "helper" (her words!), so we played with fondant. I dyed the fondant Wilton's Leaf Green, which will be the color of dad's cake. Think two tiers, the color of a golf course with golf balls decorating the sides and the figure of him on top.

Fondant always seems to go much further than I think it will. I had plenty for the 9" cake. In the words of Buddy, I "dirty iced" it with some buttercream icing that I quickly whipped up. I really iced the cake too prematurely, and the icing melted a little. This made for bumps under the fondant. Overall, it wasn't too bad! I was for some reason expecting a nightmare, trying to fit the fondant over a circular object. Here are some pictures. I was really just messing around with some shapes and letters, so pardon the awful decorating. Also, forgive us for digging in before getting a proper picture!

P.S. - we missed you, Laur!

A Fondant Dad?!

I called my mom on Thursday night and said, "You'll die when you see what I'm doing!" About an hour earlier, I was roaming the cake decorating aisle at Michael's, and $99.97 later, I had all of the materials to make... my dad (a fondant version anyway). Call me delirious from being locked up in the house during one of the most epic snowstorms of my lifetime, or perhaps I was intoxicated with excitement after hearing of a third snow day (talk to me in June, when we're making up those days, and I'm sure I won't have the same enthusiasm), but my mind was set on designing a cake for dad's surprise 60th birthday party next weekend.

I browsed one of my favorite sites, Wilton Ideas, to get a feel for the type of cake I wanted to make. I didn't find exactly what I wanted, but got some great pictures in my head. Before I left the house, I found a great video on making fondant faces. Seemed easy enough... I picked up edible markers, forming cups, creamy peach icing color; these, among other things, added to the cake decorating accessories that will soon be overtaking my laundry room. Once I started, I found myself "in the zone," kneading, dying and shaping fondant like a mad woman!

The end result was decent, but not very sturdy. I've watched enough episodes of Cake Boss to know that cereal treats are the way to go. A 7:30 am trip to Wal-Mart the next morning resulted in cereal treats galore and lots more fondant. I found the molding process fairly easy, and the end product looks much less like an elementary art project than my first attempt.

What I'm happy with: ease with which cereal treats can be molded.
What I'm not happy with: covering the treats in fondant was not quite as easy. Final product looks alright, but fondant could be smoother. The picture at the top is the final product. This was my first attempt (all fondant):

Next on my agenda... covering a cake in fondant. Is it as hard as I think it is? We shall see...

Oh, and needless to say, mom was hysterical :)

Friday, February 12, 2010

Christening Cookies


Our beautiful daughter, Olivia Emma, was baptized on September 13, 2009. While searching for ideas for cookies for the occasion, I discovered Wilton ideas. I settled on this design, but since it was a baptism and not a First Holy Communion, I decided to substitute the circle in the center for a heart. In the heart, I wrote her monogram. I was very please with how these cookies looked aesthetically. I topped them off with some glittery powder, and they were a big hit!